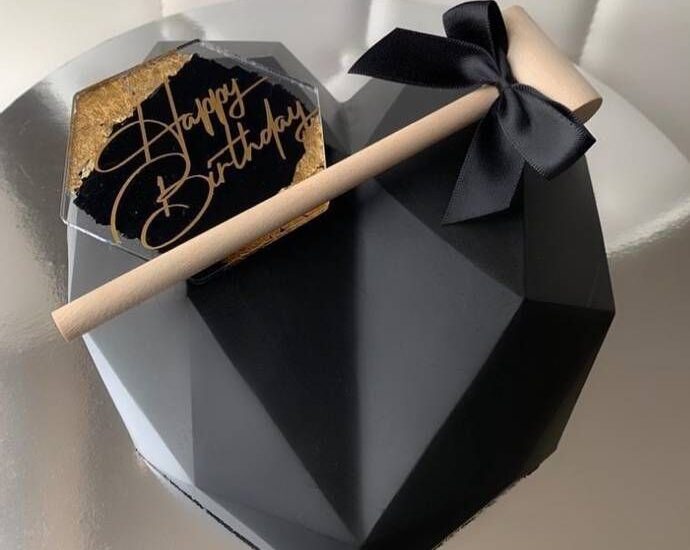
I’ve spent close to fifteen years making custom cakes out of my kitchen in HSR Layout, and if there’s one cake that brings both excitement and panic in equal measure, it’s the piñata cake. I get messages almost every week from someone who tried making one at home — the shell cracked while unmoulding, the chocolate seized up, the candies spilled out before the big reveal, or the whole thing collapsed on the drive to the party. It happens to almost everyone the first time.
The good news is that a piñata cake is completely doable at home once you understand why these things go wrong. It’s not about fancy equipment — it’s about a handful of small technical details that most recipes online skip over entirely. In this guide, I’ll walk you through the exact process I use, explain the “why” behind each step so you’re not just following instructions blindly, and tell you honestly when it’s actually smarter to order one instead of making it yourself.
What Is a Pinata Cake?
A pinata cake is a hollow cake with a chocolate or cake shell that’s cracked open at the table to reveal a surprise filling of candies, chocolates, or small treats inside — essentially a dessert version of the traditional pinata. It’s typically finished with a smash-reveal moment using a small mallet or the back of a spoon, making it as much an experience as it is a dessert.
Most pinata cakes have two components: an outer shell (usually tempered chocolate, though some bakers use a thin cake shell) and an inner cake that’s been hollowed out to hold the surprise filling. The magic is in the reveal — everyone gathers around, someone taps the shell, and the candies spill out onto the plate.
Why Everyone Loves Pinata Cakes
Pinata cakes have become one of the most requested birthday cakes in Bangalore over the last few years, and it’s not hard to see why. They turn cake-cutting into an actual moment — kids and adults both love the smash reveal, and it photographs beautifully for social media, which matters a lot for parties these days.
They’re also flexible. You can theme the shell color and filling to match almost any occasion — a football-themed pinata cake for a kid’s birthday, a rose-gold shell with mini chocolates for an anniversary, or a corporate-branded color palette for an office celebration. That versatility is a big part of why we get so many custom requests for them at Ank Cake Land.
Can You Really Make One at Home?
Yes, you can make a pinata cake at home, but success depends heavily on getting your chocolate tempering right and being patient with the cooling and unmoulding process. The cake itself isn’t difficult — it’s a regular sponge. The chocolate shell is where most beginners struggle, mainly because tempering chocolate is temperature-sensitive and Bangalore’s humidity doesn’t always cooperate.
If you’ve never tempered chocolate before, expect your first attempt to be a learning cake, not a perfect one. That’s normal. I still remember my own first few shells cracking right in front of me.
Things You’ll Need
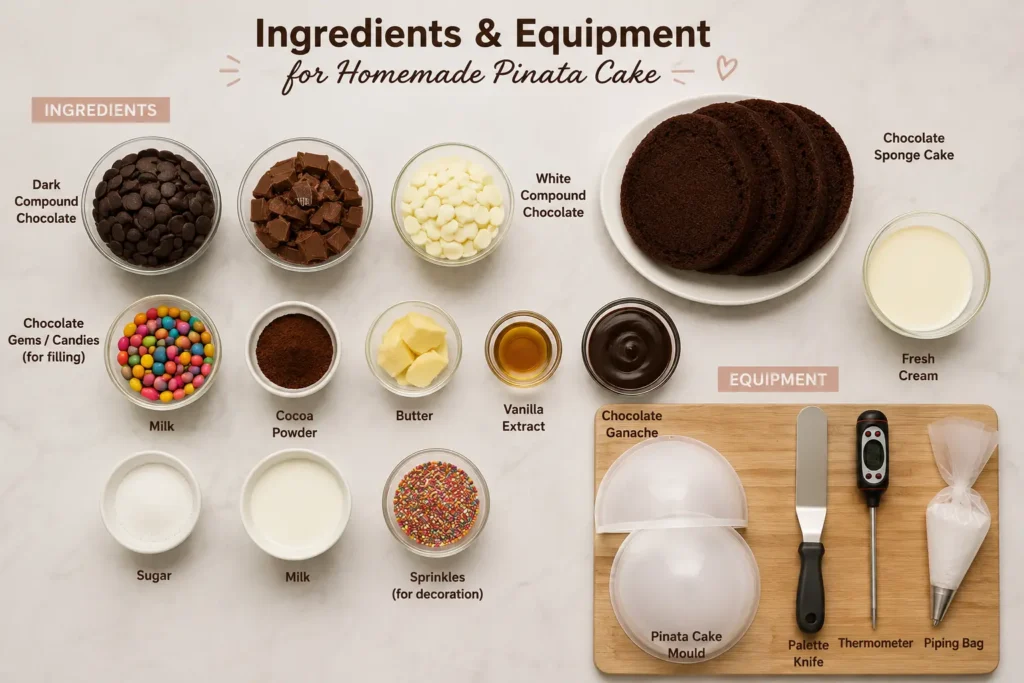
Ingredients
- Compound chocolate or couverture chocolate (dark, milk, or white) — 400–500g for a 6-inch shell
- Sponge cake of your choice (vanilla, chocolate, or red velvet) — two 6-inch layers
- Buttercream or ganache for assembly
- Small candies, chocolates, or sprinkles for the surprise filling
- Food-safe colour (if you want a coloured shell)
- Cocoa butter or a small amount of oil (helps with sheen and prevents cracking)
Equipment
- A hemisphere silicone mould (6-inch, sold online or at baking supply stores)
- A kitchen thermometer (this is non-negotiable for tempering)
- A double boiler or microwave for melting chocolate
- An offset spatula
- A turntable (helps but isn’t essential)
- A small mallet or wooden spoon for the reveal moment
Quick Tip: If you don’t have a hemisphere mould, a well-greased steel or glass bowl of the right size works as a substitute — just make sure it’s completely dry before you pour chocolate into it, since any moisture will cause the chocolate to seize.
Step-by-Step Process
How to Make the Chocolate Shell
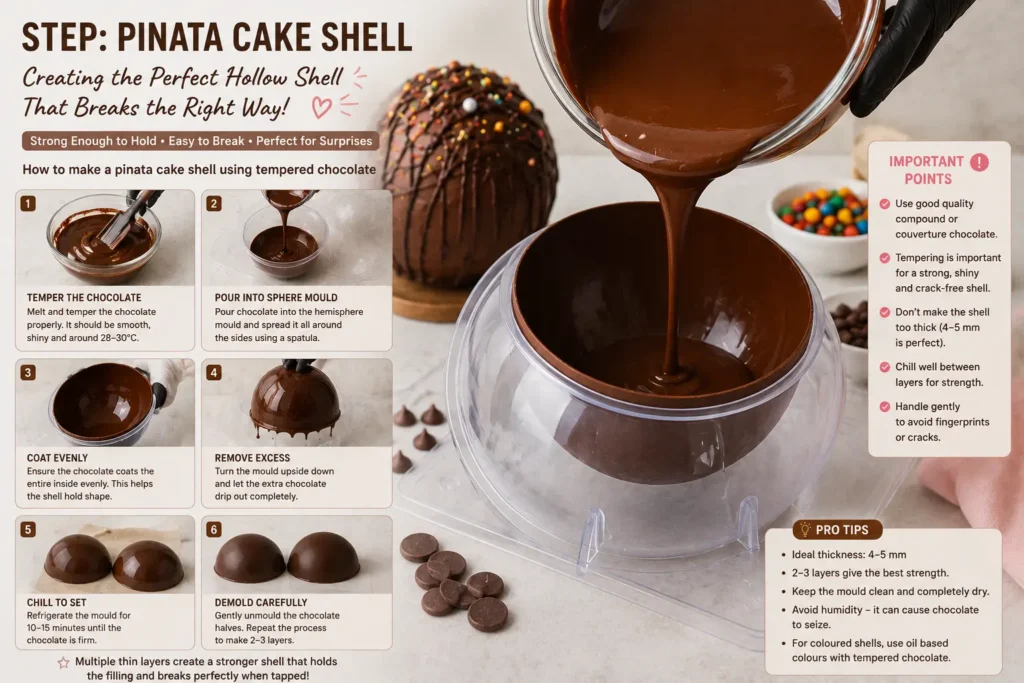
The chocolate shell is the trickiest part of a pinata cake, and getting it right comes down to proper tempering — heating and cooling the chocolate to specific temperatures so it sets with a glossy finish and a clean snap instead of a dull, streaky, soft shell.
Here’s the process I use:
- Melt two-thirds of your chopped chocolate slowly, either over a double boiler or in short microwave bursts, stirring often.
- For dark chocolate, bring it to around 45–50°C, then cool it down to 27–28°C by stirring in the remaining chocolate.
- Reheat gently to 31–32°C (for dark chocolate) — this is your working temperature. Milk and white chocolate work at slightly lower ranges, around 29–30°C working temperature.
- Pour a thin, even layer into your greased hemisphere mould, tilting it to coat the sides completely. Pour out the excess.
- Chill in the fridge for 8–10 minutes, then repeat with a second thin coat for strength.
- Let it set fully in the fridge for at least 30 minutes before attempting to unmould.
Why shells crack: Nine times out of ten, a cracked shell comes down to one of three things — the chocolate wasn’t tempered properly, the shell was too thin, or it was unmoulded before it had fully set. Bangalore’s humidity can also cause condensation on the mould, so always dry it completely before pouring.
How to Bake the Cake
Bake your sponge in two 6-inch round tins so you have flat layers to work with. Let them cool completely before handling — a warm cake will melt your chocolate shell on contact, which is a mistake I still see people make when they’re in a hurry.
How to Assemble
Trim one cake layer flat and use it as your base. Place your set chocolate shell (still in its mould, or carefully unmoulded) on top, then trim the second cake layer to sit around the shell rather than on top of it, so the hollow space stays intact.
How to Fill
Once your shell is assembled onto the base, drop your candies, mini chocolates, or treats directly into the hollow shell before closing it up with the top layer of cake and a final coating of buttercream or ganache to seal everything in and hide the seam.
How to Decorate
Cover the entire cake in your buttercream or ganache of choice, then add any theme elements — sprinkles, edible glitter, piping, or fondant details — on the outside. The idea is that from the outside it looks like a completely normal cake, and the surprise only reveals itself when it’s cracked open.
Common Mistakes Beginners Make
- Skipping the tempering process entirely — melting chocolate and pouring it straight into the mould without controlling temperature. This almost always results in a soft, streaky shell that won’t hold up.
- Unmoulding too early — patience matters more than most people expect. A shell needs full chill time before it’s stable enough to handle.
- Using warm cake against the shell — this melts the chocolate on contact and ruins the shape.
- Making the shell too thin — a single thin coat looks elegant but breaks under the weight of the cake and filling. Always double-coat.
- Overfilling with heavy candies — too much weight inside puts pressure on the shell before the reveal, sometimes cracking it prematurely during transport.
- Not accounting for humidity — condensation on a cold mould or in a humid kitchen affects how chocolate sets. Keep your workspace as dry as possible.
Recommended: How to make a chocolate pinata cake
Professional Tips from Experienced Bakers
- Always use a thermometer. Eyeballing chocolate temperature is one of the most common reasons home attempts fail.
- Work in small batches — chocolate that’s been reheated too many times loses its temper and won’t set with the same shine.
- If your kitchen is warm, chill your mould in the fridge for a few minutes before pouring the chocolate; it helps the shell set faster and more evenly.
- Transport the finished cake in a box that’s slightly larger than the cake itself, with something to stop it sliding — pinata cakes are more fragile in transit than regular cakes because of the hollow centre.
- If you’re a first-timer, practice your shell separately before committing to the full cake. A cracked practice shell costs you a bit of chocolate; a cracked shell on the day of the party costs you the whole cake.
Best Chocolate to Use
Couverture chocolate gives the cleanest snap and glossiest finish, but it requires precise tempering. Compound chocolate is far more forgiving for beginners — it doesn’t need tempering in the same way and sets reliably, though the shine and snap won’t be quite as premium. If this is your first attempt, I’d genuinely recommend starting with compound chocolate rather than risking couverture on your first try.
How to Store
A pinata cake should be stored in the refrigerator and is best consumed within 2–3 days for optimal freshness. Keep it in an airtight container or covered loosely with cling film to prevent it from absorbing fridge odours. Bring it to room temperature for about 20–30 minutes before serving so the chocolate shell isn’t too hard to crack cleanly.
How Long Does It Last?
Refrigerated properly, a pinata cake stays fresh for 2–3 days, though the chocolate shell itself can last longer if stored separately from the cake. Beyond three days, the sponge starts to dry out even in the fridge, and the buttercream can lose its texture.
Can You Make It Eggless?
Yes, a pinata cake can absolutely be made eggless — the shell itself never contains egg to begin with, so the only adjustment needed is using an eggless sponge recipe for the cake layers. At Ank Cake Land, eggless is actually one of our most requested options, since a large share of our customers prefer it for religious or personal reasons.
Can You Make It Without a Mould?
Yes, you can make a pinata cake shell without a specialised mould by using a well-greased steel or glass bowl of the right size instead. The key is making sure the bowl has smooth, even curves and is completely dry before you pour in the chocolate — any texture or moisture on the surface will transfer to your shell and make it harder to release cleanly.
Cost of Making at Home vs Buying
| Making at Home | Ordering from Ank Cake Land | |
| Cost | Chocolate, sponge ingredients, mould — usually cheaper for one cake, but the mould is a one-time cost if it’s your first time | Fixed price, includes labour, expertise, and packaging |
| Time | 3–5 hours including tempering, baking, cooling, and assembly | None — ready on your chosen date |
| Risk of failure | Real, especially on your first attempt | None — made by experienced hands |
| Finish quality | Depends on your chocolate-tempering skill | Consistent, professional glossy shell |
| Best for | Practice, small family celebrations, hands-on experience | Birthdays, corporate events, last-minute needs, guaranteed results |
Should You Make It Yourself or Order One?
If you enjoy baking, have a free afternoon, and don’t mind a possible do-over, making a pinata cake at home is genuinely satisfying — there’s real pride in cracking open a shell you made yourself. But if the occasion matters and you can’t afford for it to go wrong, ordering from a professional bakery removes that risk entirely.
When Ordering Makes More Sense
There are a few situations where I’d honestly tell a friend to just order the cake rather than attempt it themselves:
- Large birthday parties where the cake needs to serve a big group and look flawless in photos
- Corporate celebrations, where consistency and presentation reflect on the brand
- Last-minute orders, since a properly tempered shell needs time to set and there’s no room for a failed first attempt
- Complex or personalised themes — custom colours, logos, or intricate designs that need a trained hand
- When you simply don’t have the equipment — not everyone owns a hemisphere mould or a kitchen thermometer
A professionally made piñata cake saves you the time, reduces the chance of a wasted attempt, and guarantees the reveal moment actually goes the way you pictured it. That’s exactly why we build custom pinata and bomb cakes in Bangalore around each customer’s theme, colour palette, and filling preference.
If you’d rather skip the trial-and-error and get a guaranteed flawless pinata cake for your celebration, reach out to us on WhatsApp — we do custom themes, eggless options, and premium chocolate shells, made fresh out of our HSR Layout kitchen.
Why does my pinata cake shell keep cracking or collapsing?
This is the single most common complaint from home bakers. It usually happens because the shell was too thin, wasn’t fully set before handling, or the mould material was wrong — glass moulds tend to hold too much heat and cause the chocolate to keep melting rather than setting properly, while metal bowls or pans release the shell more cleanly. If your shell cracks, the only real fix is to re-melt the chocolate and start the shell over — there’s no patching a hairline crack invisibly.
Why did my cake layers fall apart when I tried to hollow them out?
A lot of home attempts fail here because the cake itself wasn’t baked through properly, so it’s too fragile to carve or stack once hollowed. One baker described a middle cake layer breaking into three pieces after being cut into a ring, with the bottom layer cracking and the top layer also starting to fall apart — all traced back to underbaked sponge. A dense, fully-baked cake holds its shape far better under the smash than a light, fluffy one
What candy filling should I avoid using inside a pinata cake?
Not every candy works. One baker who used gummy worms found that they were tough to cut through and didn’t spill out in the classic “smash” style — she ended up having to fork them out of the cake instead, and noted she’d switch to something like M&Ms or Skittles next time. Soft, individually wrapped or small hard candies spill and photograph far better than sticky or fibrous ones
Why does my cake shape flatten or sag before I even cut it?
This is usually an overfilling issue. If the pan is filled too high relative to how much the batter will rise, the cake loses its round dome shape as it cools and can visibly sag or crack at the surface. As one baker put it after her fish-shaped cake went flat, the fix is not overfilling the pan in the first place — it’s hard to judge in advance since different recipes rise by different amounts, so it helps to pick a recipe that doesn’t rise too much
Can I use a regular bowl instead of buying a proper mould?
Yes, but the material matters more than people expect. Bakers who’ve tested this found aluminium or stainless steel bowls and cake pans work well because a warm, wet towel around the outside helps the shell slide out — while glass moulds tend to be too thick and cause the chocolate to keep melting instead of setting. So skip the glass mixing bowl in your kitchen cabinet — steel is the safer substitute.